Project kali ini bakalan membangun sebuah Server lokal yaitu cloud storage server dengan raspberry pi sebagai personal cloud storage.
Bahan yang perlu adalah :
- Raspberry Pi 0w,1,2,3, atau 4
- Etcher
- Micro SDCard minimal 8GB
- Raspbian Image Latest/Terbaru
Step installasi Raspbian Image lansung saya lewati, kita langsung saja menuju ke install dependencies :
INSTALL APACHE dan PHP
1. Ketikan perintah ini untuk update repository dan package :
sudo apt update
sudo apt upgrade
2. Ketikan perintah ini untuk install apache2 webserver :
sudo apt install apache2
Note : jangan lupa tes apache2 webserver …!\
3. Ketikan perintah ini untuk install php package :
sudo apt install php7.3 php7.3-gd php7.3-sqlite3 php7.3-curl php7.3-zip php7.3-xml php7.3-mbstring php7.3-mysql php7.3-bz2 php7.3-intl php7.3-smbclient php7.3-imap php7.3-gmp
Note : Recommended banget jika memakai Raspbian versi Buster …!
4. Step akhir ketikan ini untuk restart apache2 webservice :
sudo service apache2 restart
Setting up a MySQL Database and User for Nextcloud
1. Ketikan ini untuk install Mysql Server :
sudo apt install mariadb-server
2. Stlh terinstall anda butuh perintah untuk menyetting mysql password :
sudo mysql_secure_installation
Note : untuk install lebih lanjut anda tinggal pilih Y untuk semua pilihan.
3. Untuk akses mysql via terminal atau CLI ketikkan ini :
sudo mysql -u root -p
4. Enter Mysql password yang kamu masukkan pada step 3 :
5. Buat database baru untuk Nextcloud Database :
CREATE DATABASE nextclouddb;
6. Next step membuat user untuk berinteraksi dengan Nextcloud database :
CREATE USER 'nextclouduser'@'localhost' IDENTIFIED BY '[PASSWORD]';
Note : nextclouduser = username kamu and then [PASSWORD] = password ..!
7. User kamu butuh hak akses agar user bisa akses database :
GRANT ALL PRIVILEGES ON nextclouddb.* TO 'nextclouduser'@'localhost';
Note : nextclouduser = username and then nextclouddb = databasenya ..!
8. Final Step flush privelege table :
FLUSH PRIVILEGES;
Downloading Nextcloud on your Raspberry Pi
1. Change directory ke var/www our move html direktori :
cd /var/www/
2. Download nextcloud archive dengan curl command :
curl https://download.nextcloud.com/server/releases/latest.tar.bz2 | sudo tar -jxv
3. Membuat direktori data didalam direktori nextcloud :
sudo mkdir -p /var/www/nextcloud/data
4. Memberikan hak akses webserver dan group webserver pada direktori nextcloud :
sudo chown -R www-data:www-data /var/www/nextcloud/
5. Final step memberikan hak akses pada direktori data :
sudo chmod 750 /var/www/nextcloud/data
Configuring Apache for Nextcloud
Next, kita perlu bernegosiasi dengan .htaccess
Sebelumnya kita install nextcloud pada direktori default apache2 /var/www/, kita perlu merubah setiingan apache2 agar bisa configurasi over .htaccess
Next, kita perlu membuat configurasi untuk nextcloud.
1. Buat config file pada apache2 host setting :
sudo nano /etc/apache2/sites-available/nextcloud.conf
2. Di file tersebut isi dengan config berikut :
Alias /nextcloud "/var/www/nextcloud/"

<Directory /var/www/nextcloud/>
  Require all granted
  AllowOverride All
  Options FollowSymLinks MultiViews

  <IfModule mod_dav.c>
    Dav off
  </IfModule>

</Directory>
Note : These changes will allow Apache2 to read and utilize the .htaccess files within the Nextcloud directory.
3. Now we can save and quit out of the file by pressing :
CTRL + X then pressing Y and then ENTER.
4. We can do this by utilizing the a2ensite command followed by nextcloud.conf.
sudo a2ensite nextcloud.conf
5. Now we need to restart Apache2 to force it to read in the updated configuration file.
sudo systemctl reload apache2
Nextcloud Initial Setup
If you don’t know your Raspberry Pi’s IP address you can make use of the command hostname -I.
Remember to replace [IPADDRESS] with that of your Raspberry Pi’s.
[IPADDRESS]/nextcloud
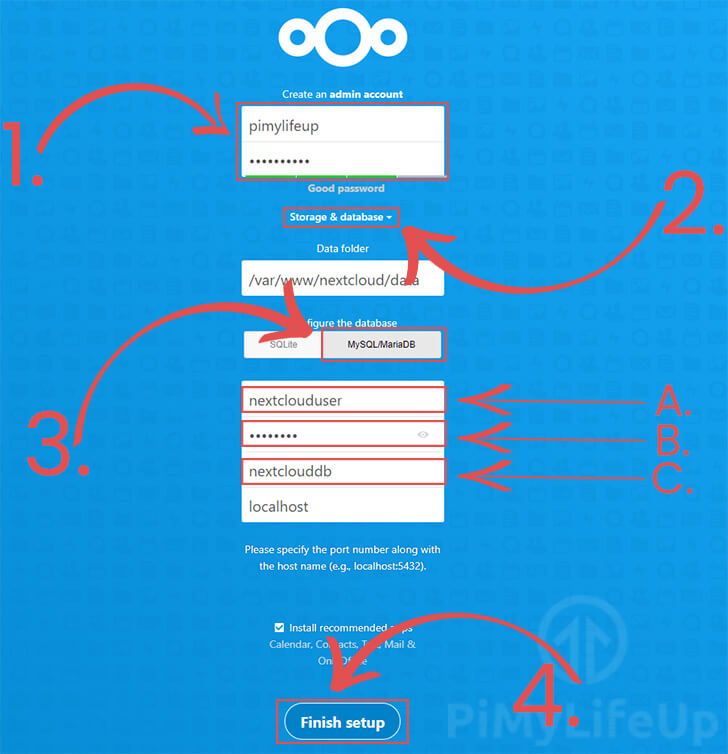
Here you will need to type in the Username and Password (1.) that you intend to use for your admin account.
If you plan on allowing your Nextcloud file service to be accessible from outside your network, make sure that you use a long and secure password.
Next, we need to specify the details for our database server. To get to these options you will need to click the “Storage & Datbase” option (2.).
Now you need to slect the type of database we want to use. As we are using an SQL server click the “MySQL/MariaDB” (3.) option.
Finally we need to enter the details for our database server. There are three bits of information that we will need to enter.
- The username for the user that will interact with our database server. (A.) If you are using the same information we used, this setting should be set to
nextclouduser. - The password that you set for the above user. (B.)
- The final option you will need to set is the database name. (C.) If you have been following our guide this will be
nextclouddb.
Once you are happy with this, press the “Finish Setup” button (4.), please note this can take some time to complete as it finalises your setup.